When you write a long post, then it will be user-friendly if you can separate them in different sections. It helps the users to skip certain parts of the content and move up and down in the article to read the information that they need.
In this post, we will discuss how to create anchor links in WordPress. If you are want to create anchor links, then you should read this post thoroughly.
What are Anchor Links?
Anchor Links help you jump to the specific part of the post. With the help of these links, you can jump from a particular position to the desired portion in the post.
You may have noticed that anchor links are responsible for creating the Table of Contents in the articles. It is helpful to separate the long pieces in different sections. The anchor links can be created either with the name attribute or ID attribute.
Anchor Links, by default, jump directly to specific headings. But, you can change it for a smooth scrolling experience.
Before learning how to create anchor links in WordPress, have a look at these positive and negative aspects of anchor links.
Advantages
It creates a better user experience. If the post is long, then it will consume a long time to read and scroll through the entire content. However, if there are anchor links, the readers can jump to the specific section to read the content.
If you have created anchor links in your post, there are several times when the anchor links appear on SERP listing. As a result, the CTR of the site increases as the user might see something interesting attached to the search results.
Disadvantages
It decreases the average time a user stays on your site. If the content separates with the help of different sections, the user prefers to go to their desired section without wasting their time.
If your website runs on ad revenue, you may experience fewer impressions and clicks. That, in return, will affect your site earning.
How to create anchor links in WordPress manually?
There are two things you need to remember before you create an anchor link:
- Add the # sign before the anchor text.
- Add the id attribute to the destination text.
Let’s discuss it in detail.
Step 1: Create an Anchor Link
Firstly, you need to select the text, image, or button where you want to create an anchor link.
Click on the insert link option after selecting it.
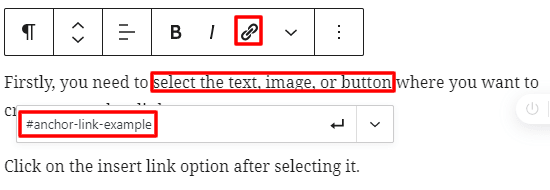
Usually, you keep the URL of the post or page to link. But, to create an anchor link, use # as a prefix followed by the keywords of the section where you want your users to go.
Click the enter button to create the link.
You should include keywords in the anchor links and use hyphens to separate words. Besides, it would be best if you prevented making long anchor links.
After you create the link, you will see that the clicking on the link is not working on the editor. It is because you need to add an anchor link as an ID.
Step 2: Add the ID attribute to the destination section
Go to the portion where you want to move your users when they click the anchor link. The destination section can be a heading block, paragraph block, or any other block.
If the destination section is a heading, select the heading block and open the block settings on the right. You will see the HTML Anchor field under the Advanced tab.
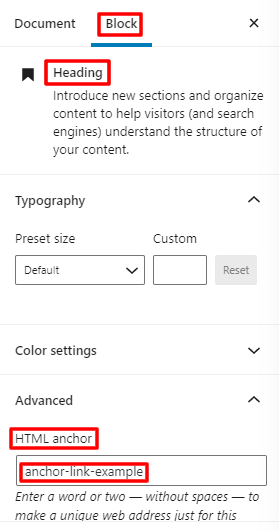
In the HTML Anchor field, you need to add the text that you used to create an anchor link. Do not add the prefix # in this case.
Save the post then click the anchor link to move you to the desired section.
Now you know how to add anchor ID in heading block. As we discussed earlier, the block may also be any other block-like paragraph. For any other blocks, at first, you need to open the block settings. You can edit the HTML code for that block when you click Edit as HTML. You will see the HTML attribute like <p>,<table> for paragraph, table block respectively, etc.
<p id="anchor-link-example"></p>
You should add the anchor to the ID attribute. But be careful not to add the prefix #. This medium should be similar to what we did in the heading block.
Click convert to HTML if the screen shows unexpected or invalid content. Save the changes, and then you are ready to start.
Also, you can send your users to an anchor link on another page. For this you need to add URL with HTML anchor as shown in the example below:
example.com/desiredpage#desired-anchor
How to create anchor links in HTML
It is similar to the step done above. First, you need to create an anchor link with # prefix and <a href=””> tag.
<ahref="#anchor-link-example">Example of Anchor Link</a>
After you create the link, scroll down to the destination section where you want to send your users. This section can be any HTML element like heading, paragraph.
In the HTML tag, the id attribute should contain the anchor link without the # prefix.
<pid="anchor-link-example">Destination of Anchor Link</p>
This is an example in the case of a paragraph tag. You can add an id attribute to other HTML elements in a similar manner.
How to add headings as anchor links automatically
Bloggers prefer it as it saves the time and effort to create anchor links time and again for every post. Different plugins are useful to create tables in WordPress.
Here is the list of table plugins that we recommend for your site:
Best Free Table Plugins for WordPress
Please install one of the plugins and activate them. Then test the settings of the plugin to add headings of the post as anchor links automatically in the table of contents.
Conclusion
I am hopeful that this post was useful for you to know how to create anchor links in WordPress.
Additional Reading