If there are too many images on your site, they are uploaded in either PNG or JPG format. Learning how to use WebP images in WordPress helps you to reduce the file size of the images and optimize the images of your site for fast loading.
What is WebP?
You must have widely used image file types like JPEG, JPG, and PNG in the past. In addition to these basic image types, there are also other image file types that you must have heard about.
WebP is developed by Google to optimize images for fast loading. It focuses on delivering the images files by reducing the file size. If you use images on a regular basis on your site and if you can reduce the file size of all those images, then it will significantly improve the speed of your website.
If you check the site through Pagespeed insights, you will get a recommendation to “Serve images in next-gen formats” if you haven’t done that already and WebP is one of those recommended formats.
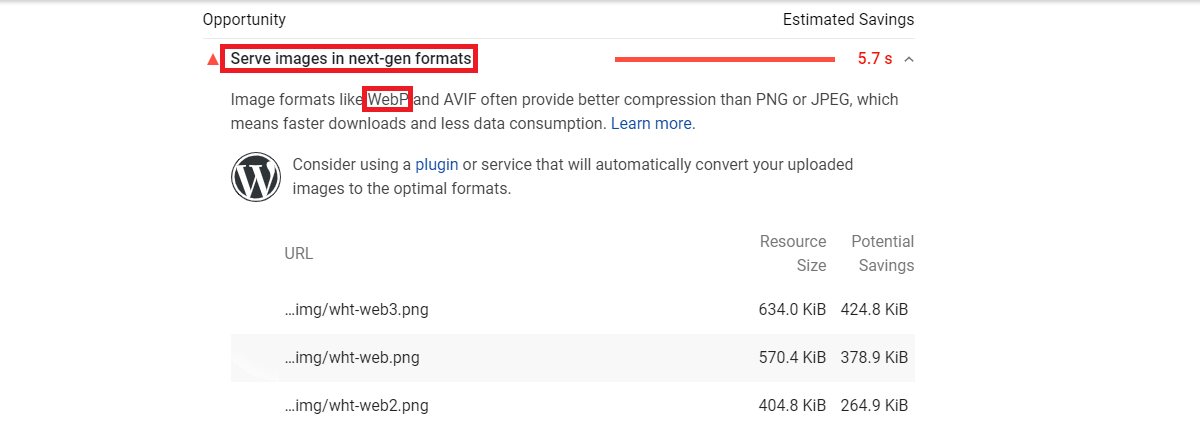
Image Compression may be either lossless or lossy. PNG image is a good example of lossless compression. During lossless compression, the compressed images lose less quality as compared to lossy. Actually, compression in lossless images happens by reducing unwanted bits of data that are present in the images. Due to this reason, if needed you can decompress it to recover the original image.
On the other hand, lossy images have a small file size than lossless images as it removes bits of data permanently from the images. As a result, the quality is compromised in the compression of JPG/JPEG files.
WebP image format can be also be compressed to either lossless or lossy type. However, it avoids the compromise in quality during compression. WebP makes use of predictive coding to reduce the file size if you use lossy compression while in the case of lossless compression WebP utilizes complex methods to compress image files. As a result WebP image compression is better than the traditional PNG/JPG compressions.
Google has already said that the size of the WebP image file is 26% less than the PNG image and it is also 25-34% less than the JPEG image.
That’s the reason why you should learn how to use WebP images in WordPress whenever it is possible.
Advantages and Disadvantages of WebP Images
You need to note that for a WebP image file to work, the visitor of the page should be using the WebP compatible browser. More than 95% of the users use the web browser that supports WebP. The browsers like Chrome, Firefox, Opera, Microsoft Edge give full support to WebP images.
The recent versions of ios and macOS Safari are compatible with WebP while the older versions do not support WebP. Also, Internet Explorer does not support the WebP version of images. However, it is a relief that Edge has replaced IE.
As we already know that using WebP images makes our site faster, but since it is not compatible with minor browser versions, Will it be a good practice to use WebP on your site?
Making your site faster doesn’t mean that you have to deliver unsupported content to your users. However, you have to deliver WebP images to the browsers that support them. While if you have a copy of PNG/JPG images, you can deliver it to unsupported browsers. This is the proper way of handling the WebP version of images.
How to use WebP images in WordPress?
You can choose either of the methods listed below that suits your site to add the WebP images.
CDN
There are a lot of CDNs available for your WordPress site to serve your website content from different global locations. Using a CDN will make a website comparatively fast than without using it.
Some of the most popular CDNs are Cloudflare, MaxCDN, KeyCDN, and StackPath. Using any of these CDNs allows you to convert your images files to WebP format. It also serves those files to the users that surf from the compatible browsers.
Image Optimization Plugin
It is a better practice to upload images in JPG/PNG and convert them to WebP with the help of image optimization plugins. Here is a list of recommended plugins that convert image files to WebP format.
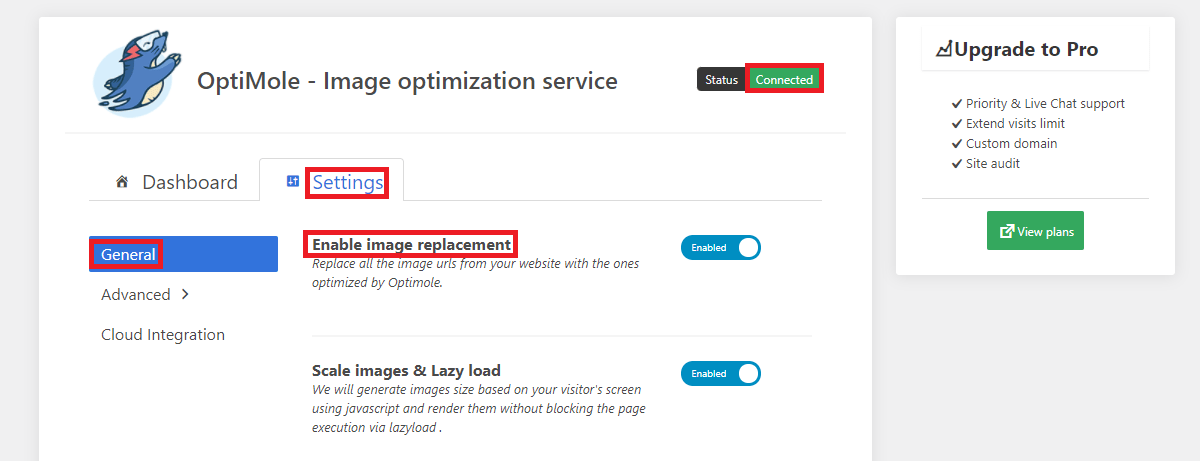
Optimole
With its help, you can replace the images of your site with the image URLs optimized by Optimole. In addition to the WebP conversion, it also automatically resizes images according to the user’s screen.
The free plan of Optimole includes a monthly quota of 5000 visitors. But, if that’s not sufficient for you you can purchase a premium plan to upgrade that limit to 25000.
After you install and activate the plugin you need to create an API key as instructed in the settings of the plugin. Once the plugin is connected, it will optimize your images and start serving the WebP version of the images to all the supported browsers from their CDN.
Imagify
When you create an account in Imagify, you will get an API key that you need to enter in the plugin after activation. If you upload less than 200 images per month, then Imagify is the solution for you. The free plan includes 20MB or 200 images per month. If it’s not sufficient, you can opt-in for the available premium plans.
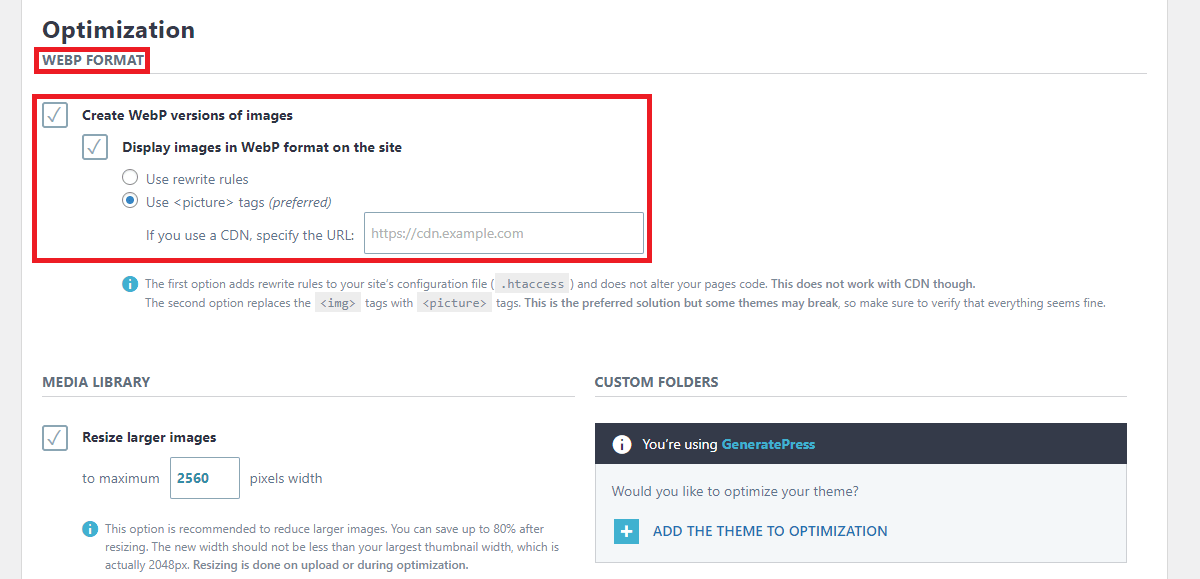
If you look at the settings, you can create a WebP version of the images and display them on the site. While displaying the images you can use the picture tags in the settings than rewriting rules.
If you use the Imagify plugin, then you can also improve your website speed with the Media settings in the WP Rocket plugin. Since WP Rocket and Imagify are created by WP Media, the plugins are compatible as well.
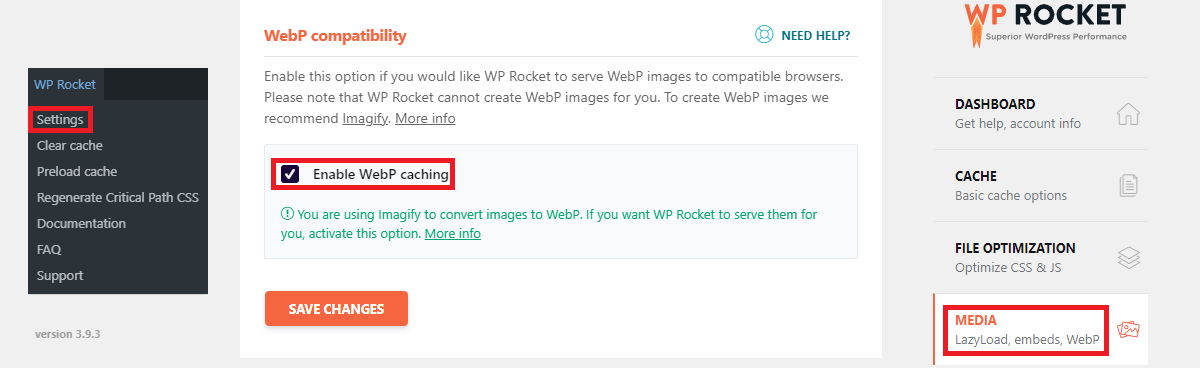
In the WebP Compatibility of WP Rocket settings, you can enable WebP caching if you want these images to serve from the WP Rocket caching.
If you have a look at the official WordPress repository, you can get several other image optimization plugins. However, we recommend you to use either of these two plugins mentioned in this post if you need a solution for web images.
Manually
You can either use a CDN, plugin, or both of these to use WebP images. If you like the manual method have a look at the description below:
First of all, you need to convert your images to WebP format before uploading. There are various online converters that you can find on Google.
Take note that the Adobe Photoshop plugin gives you permission to save the image files in the WebP format. After you convert your image to WebP format, now you can upload them via. your dashboard.
Before uploading you need to make some changes to the theme editor. In the functions.php file of your active theme, add this code towards the bottom:
//** *Enable uploading webp images.*/
function enable_webp_mimes($existing_mimes) {
$existing_mimes['webp'] = 'image/webp';
return $existing_mimes;
}
add_filter('mime_types', 'enable_webp_mimes');
After you add this code, Go to Media>Add New and add your WebP files.
Wrapping Up
Now you should be able to know how to use WebP images in WordPress. You can try one of the methods listed in the post. If there are any suggestions or confusions regarding the post, kindly contact me at amar@codeflist.com
Related Posts