In the present context, every business owner maintains their own site for the online presence. When something unexpected happens with the site, it can be troublesome to the site owners. Everyone has observed error messages while surfing the internet someday in their life, no matter what type of error was. In this post, we will discuss what is 403 Forbidden Error? After having a general concept about the error, we will also see how to fix 403 forbidden Error?
What is 403 Forbidden Error?
When everything is working well on the site, the webserver returns the browser request with an HTTP header (200 status code). Whenever you try to visit the file, resource, or a page whose access is forbidden, then an error message pops up on the screen displaying messages related to Access Denied, Forbidden Errors, or something similar like that. There are different HTTP status codes that the server returns when any problem occurs.
Basically, 403 Forbidden Error occurs when the server cannot provide the access to complete the request. The server knows what request is made but will reject your request as you do not have permission to continue.
The cause of this error may be due to accidental changes in the .htaccess file, no file permissions, or an issue with any of the installed plugins on the site.
Causes of Forbidden Error
The cause of this error may be due to accidental changes in the .htaccess file, missing file permissions, or an issue with any of the installed plugins on the site. The error appears because of the restrictions by the admin or due to change on the site unknowingly.
There is also a chance that the server is blocking the IP to access the site or the website may even be missing the index page. Sometimes the cached version shows a different link than the real-time link.
How to fix 403 Forbidden Error?
You can get this error either on your own website or when you are surfing the internet. There are various techniques that you must consider to fix this issue:
Every website utilizes caching to store the data to improve its load time. Sometimes the cached version of the page points to a different page while the actual page is already changed.
The error may also be due to the cookies. Clearing the cached version of the page makes the site load longer as the browser needs to save files again. If you are signed in to multiple websites, clearing the cookies helps to log you out from all of them. In this post, we will show you how to fix 403 forbidden Error on Google chrome by clearing the history, cache, and cookies.
First of all, open the Google Chrome browser and click three dots on the top right. Open the settings and search for the Privacy and Security section.
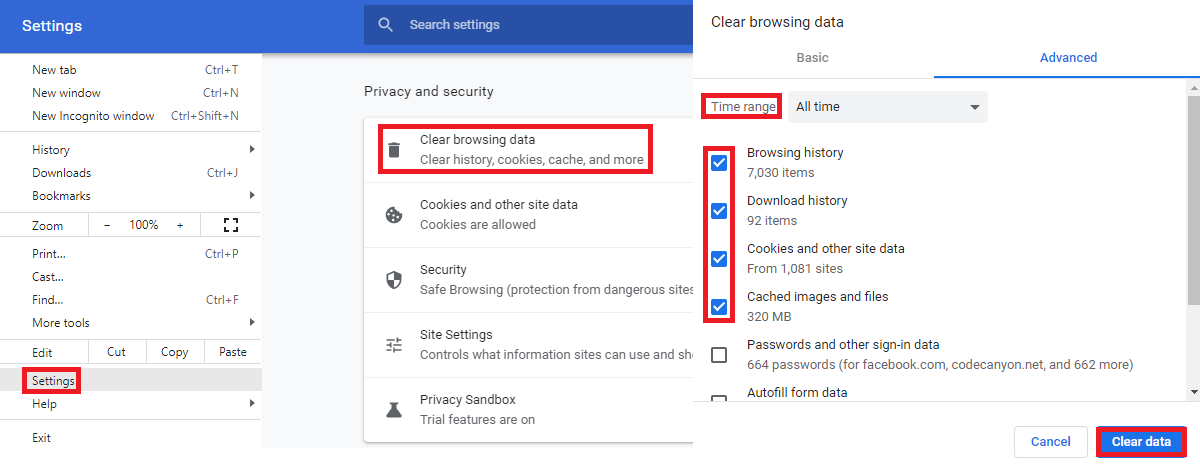
Open Clear browsing data and select the time frame to be deleted. Now you can clear the browsing history, download history, cached images and files, cookies, and other site data when you click the clear data on the bottom right.
If you have never cleared this on your Google Chrome, the size will be comparatively big and it may even take up to few minutes to complete.
Contact your ISP/Web Host Provider
After clearing the cache and cookies, if the error is not fixed, you need to contact the ISP as it may be an issue due to your IP address. Your ISP/Web host provider will fix it for you if it can be solved from their end.
ISP can change the allocated IP address as the IP you are using may be accidentally blacklisted somewhere else while your web host provider can whitelist your IP address for a particular domain if that is the cause of the issue.
Some websites block the use of VPN, so disconnect from the VPN and double-check the URL of the site and try opening the site again.
If it doesn’t solve the problem have a look at the other methods below:
Scan WordPress Plugins
The error may also be due to the faulty plugins in WordPress. To verify whether it is being caused by one of the plugins of your site, you need to deactivate all the plugins of the site and re-activate them one by one unless you find the plugin that is causing the issue.
Go to Plugins>Installed Plugins
Select all the plugins from the top and you can deactivate all of them in bulk from the drop-down menu after clicking Apply.

Once you perform this action, you should be able to access the page if any of the plugins was the reason for the issue. In such a case, you can re-active them one by one to find out the plugin that was causing this issue as we discussed above. If the error still exists after bulk deactivation, then you must understand that the 403 Forbidden Error was not due to the plugins and you do not need to check the individual plugins.
If you are unable to login into the dashboard due to this error, you should either have access to your web hosting provider account or FTP credentials of the site. All you need to do is find the root folder where WordPress is installed and inside it, you will have to rename the plugins folder to “plugins_deactivate” or something similar like this. This name will help you to find the folder location as you need to recover the plugins again.
To check the plugins from the FTP you can create a new folder named plugins and copy one plugin at a time from the renamed folder again unless you find the culprit plugin.
Once you find the plugin that is the reason for the error, you can either replace it or solve the error by checking the code with the help of a developer.
Check .htaccess file
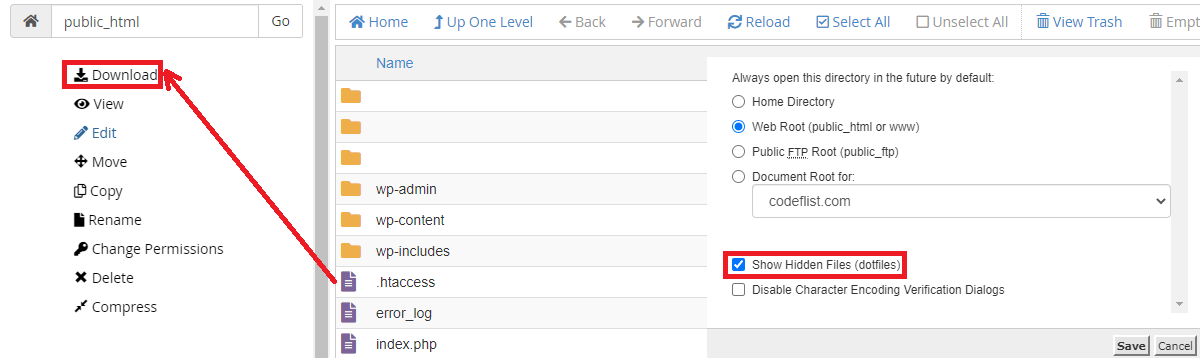
You need to login to your web hosting provider account or with the help of FTP to access your .htaccess file. Locate the root directory where WordPress is installed. .htaccess is a hidden file so you need to check view hidden files inside the settings if you do not see it.
Once you locate the .htaccess file, first of all, download it to use as a backup for future use.
After downloading, delete the .htaccess file and try to check if the 403 Forbidden Error is still present or not?
If the error is gone, then your .htaccess file was corrupted, and need to replace that file.
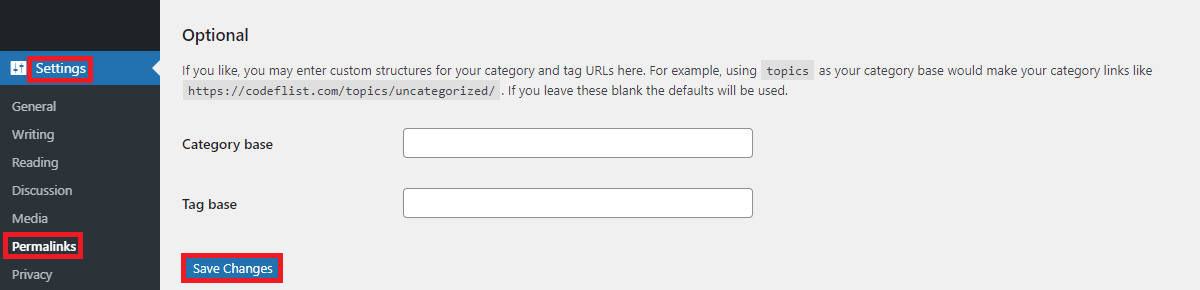
To replace the file, Go to the dashboard and open Settings>Permalinks, and Click Save changes without changing any settings.
This will recreate a .htaccess file in the root directory where WordPress is installed.
If this does not solve the problem, you need to understand that there is no issue with the .htaccess file in your system file.
File and Directory Permissions
All the files and folders in WordPress have their own special file permissions that define who can read, write, and execute them. This permission is indicated by a 3 digit numeric value that specifies the level of permission. If there is anything wrong with the file permission system, you will face the 403 Forbidden Error in WordPress.
So, how to fix 403 Forbidden Error due to File Permissions?
Find the wp-config.php file and right-click and open change permissions.
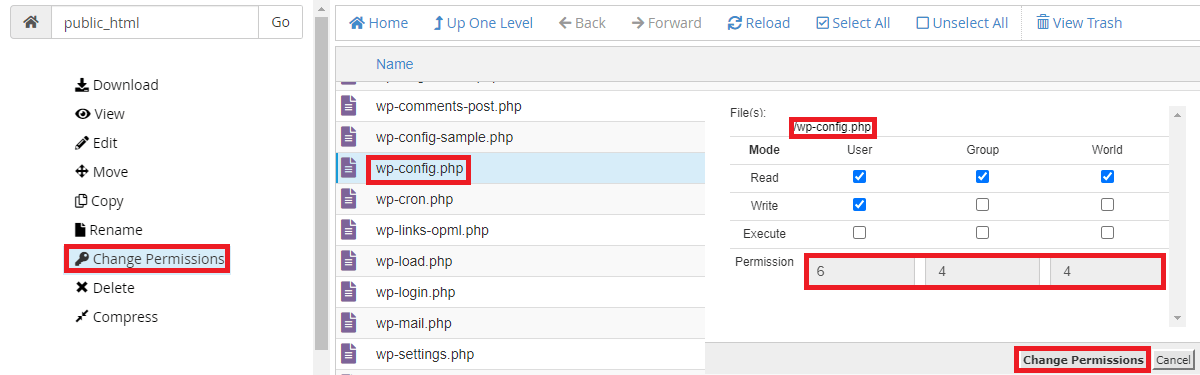
Keep 644 as the number in this window and change permissions.
In a similar way, find the root directory that contains wp-content, wp-includes, and wp-admin. Right-click on this folder and set the numeric value to 755 to apply to directories only. Once again repeat the same step and keep the numeric value 644 to apply to files only.
If there is anything wrong due to the permissions of the file, this will solve the issue.
Index Page
Check if index.php or index.html is present in the root directory or not. If it is absent, you can upload one of these files inside the root directory. Once you upload the file, you need to create a redirection from your homepage to this file in the .htaccess file by adding a line of code below:
Redirect /index.html /homepage.html
A records
To check the A records of your site, Go to cPanel>Zone Editor in the web hosting account.
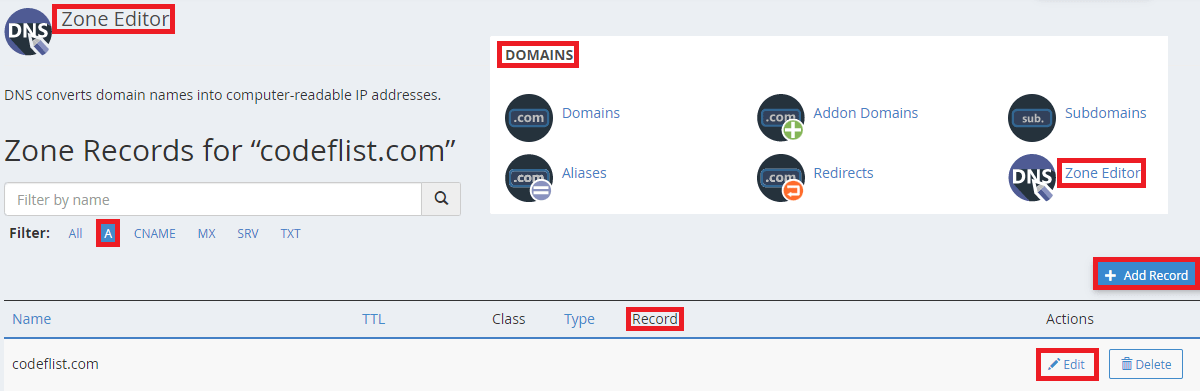
You can check the A records for your site and verify whether or not the DNS record points to the correct IP address. If the record is incorrect, you can edit a particular record. It mostly happens when you have changed the host, and forget to update the A records for your site.
Check Malware
To check the malware on the site, you need to have a backup of your site and a database of the previous working period. Try backing up your site to an earlier working period if you have the backup.
If you don’t have the backup then you can use the security plugins in WordPress like iThemes or WordFence. If your site has malware, these plugins detect the issue and help you to fix it.
Wrapping Up
Hopefully, you have clearly understood – What is 403 Forbidden Error?
There may be different reasons for this error and the error messages can be also different depending on the error. No matter what the error is if you have followed this post, you must have now known how to fix 403 Forbidden Error.
Related Posts