If you are wondering how to increase website speed, certainly you need to understand how to enable GZIP Compression in WordPress.
Website having a good speed is ranked higher in Google as well as the users of those sites have a high chance to visit them again. After you read this article, you will be able to enable GZIP Compression in your WordPress site if you haven’t done that yet.
What is GZIP Compression?
Compression, as the word suggests it reduces the size of the existing document. You can reduce the size of HTML, CSS, JS that is present on your site. During compression page breaks, whitespaces, comments, etc. are handled by GZIP as it means nothing to browsers. After reducing the user should be able to load the site faster whenever a request is made. It is one of the common optimizations made by the site owner mostly on the server-side.
When a file is requested on the browser, it checks whether or not the compressed file is present. Amazingly, all modern browsers support GZIP Compression and they will load the compressed file if it is present as soon as the HTTP request is made on the browser. This saves time for the users as well as the site loads faster.
How to check whether GZIP Compression is enabled?
You may have not enabled GZIP manually but some hosts do that automatically for your site. As, you already know that today’s browsers are compatible with GZIP, so you should also check whether GZIP Compression is active or not.
The most effective method of checking the status of GZIP Compression is as follows:
Google Chrome’s Developer Tools
You can check if GZIP is active or not on any site with the help of Chrome’s Developer Tools. That means you do not need to be an admin to perform this check.
First of all, open the site in Chrome.
Once you open the site, Open the Developer Tools either by Right Click>Inspect or Ctrl+Shift+I
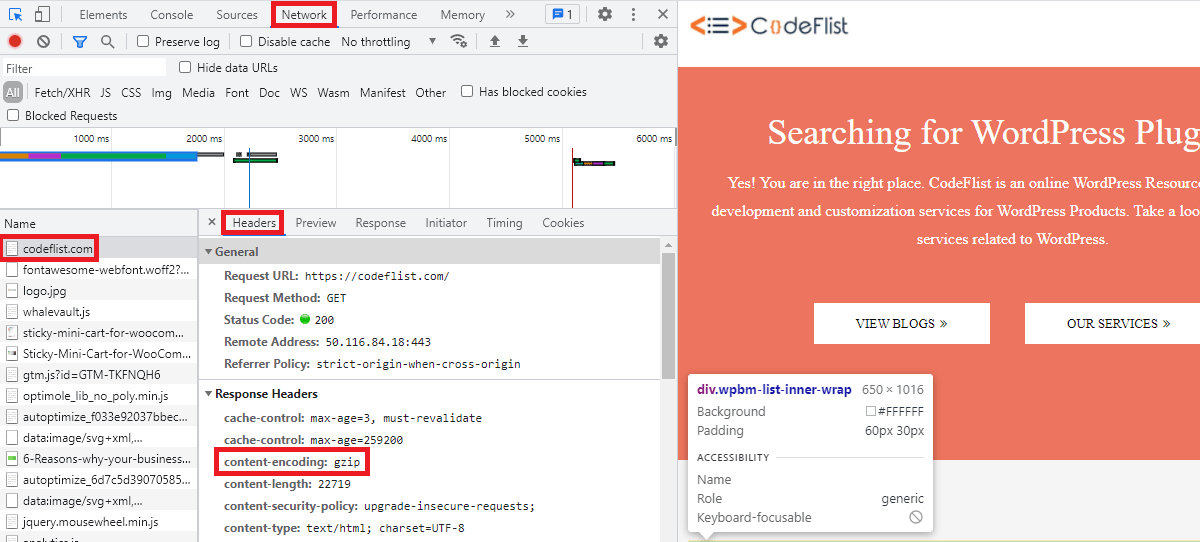
Click the Network tab. Reload the page and once you find the website URL on the left, click it and open the headers tab. Under Headers>Response Headers you will be able to see content-encoding: gzip if GZIP is enabled.

If content-encoding: br is displayed, then you need to know that GZIP is not enabled yet.
Online Tools
If you are not used to Chrome Developer Tools, then you will also get multiple sites to check GZIP status for the site.
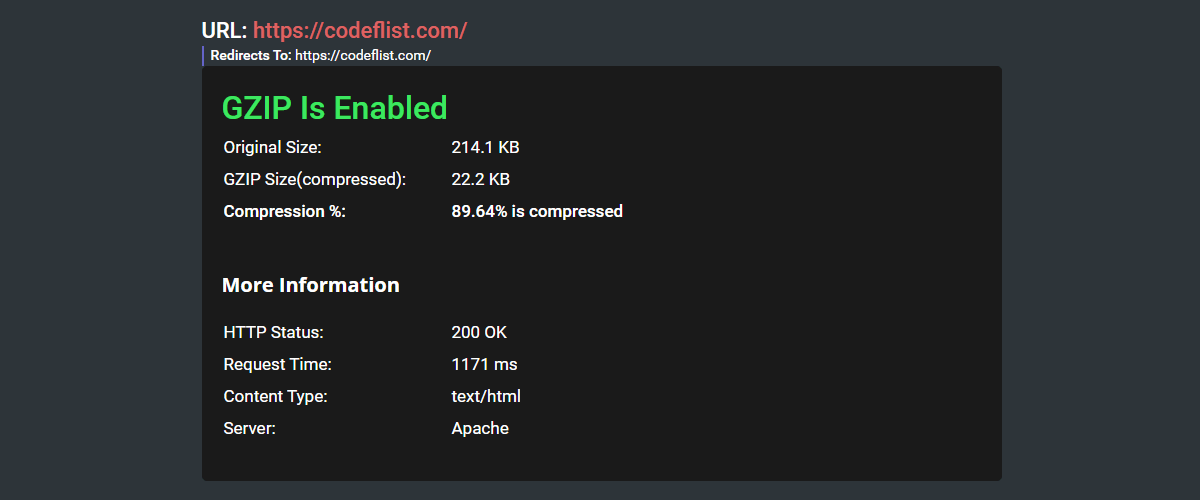
While there are several sites on the internet. We recommend this GZIP Compression Tool

It checks whether GZIP is enabled or not on a site. If GZIP is active, it also displays the percentage of compression done. Furthermore, you will also view HTTP status, Request time, Content type, and Server.
How to enable GZIP Compression in WordPress?
There are multiple ways to enable GZIP on your site. Consider understanding each of these methods and implement the one that suits best for you.
Contact Web Host Provider
Most hosting providers do this default from their end as it works from the server-side. After checking whether GZIP is enabled or not, from the above-listed method, you can contact the host support if it is not activated yet. So, this is the first method that you should give a try before taking a look at other ways.
If you have purchased a good hosting provider, they will do it for you in no time. Regardless to mention that you do not have to be involved in technical aspects once the host does it for you.
Plugin Method
If you do not get success with the above method, try to find a caching plugin with GZIP Compression. Have a look at their settings, you will be able to find the option to enable GZIP Compression. In some cases, the host does not give access to edit files on your server for GZIP Compression. If so is the case, you need to knock the hosting provider again.
Here is the list of Best Caching Plugins for WordPress that you will find for this purpose.
HTACCESS Method(Apache)
This method should be handled and implemented correctly as it breaks your site if you do it incorrectly.
For the Apache server, you can perform this method.
First, you need to locate htaccess file on your site.
Once you find it edit the file and place the below code after the # End WordPress tag.
# Compress HTML, CSS, JavaScript, Text, XML and fonts
AddOutputFilterByType DEFLATE application/javascript
AddOutputFilterByType DEFLATE application/rss+xml
AddOutputFilterByType DEFLATE application/vnd.ms-fontobject
AddOutputFilterByType DEFLATE application/x-font
AddOutputFilterByType DEFLATE application/x-font-opentype
AddOutputFilterByType DEFLATE application/x-font-otf
AddOutputFilterByType DEFLATE application/x-font-truetype
AddOutputFilterByType DEFLATE application/x-font-ttf
AddOutputFilterByType DEFLATE application/x-javascript
AddOutputFilterByType DEFLATE application/xhtml+xml
AddOutputFilterByType DEFLATE application/xml
AddOutputFilterByType DEFLATE font/opentype
AddOutputFilterByType DEFLATE font/otf
AddOutputFilterByType DEFLATE font/ttf
AddOutputFilterByType DEFLATE image/svg+xml
AddOutputFilterByType DEFLATE image/x-icon
AddOutputFilterByType DEFLATE text/css
AddOutputFilterByType DEFLATE text/html
AddOutputFilterByType DEFLATE text/javascript
AddOutputFilterByType DEFLATE text/plain
AddOutputFilterByType DEFLATE text/xml

# Remove browser bugs (only needed for really old browsers)
BrowserMatch ^Mozilla/4 gzip-only-text/html
BrowserMatch ^Mozilla/4\.0[678] no-gzip
BrowserMatch \bMSIE !no-gzip !gzip-only-text/html
Header append Vary User-Agent
Save the file when you are sure that everything is done correctly.
Enable GZIP Compression for NGINX
First of all, you need to find the configuration file nginx.conf.
Edit the file and add the following code:
gzip on;
gzip_disable "MSIE [1-6]\.(?!.*SV1)";
gzip_vary on;
gzip_types text/plain text/css text/javascript image/svg+xml image/x-icon application/javascript application/x-javascript;
Save the changes when done.
Wrapping Up
In this article, we discussed GZIP Compression in detail. If you have read the post completely then you may already know how to check if GZIP is enabled on your site and if it’s not there are different ways to enable GZIP Compression in WordPress.
Additional Readings
