The color scheme of the website reflects the overall user experience as it determines the look of your website. There may be multiple free or paid themes in WordPress, but still, there is room for improvement. This improvement can be made by changing the backgrounds or even customizing a font color. In this article, you will learn how to change font color in WordPress.
Color considerations
Color is an important part of typography that helps you to add highlights to drive in the customers. If you have a simple website with a white background with no extra color, then you are like a layman in the field of customization. Sometimes, people try too many color combinations that result in poor readability. The most important of all is that your font should be preferred by visitors.
As a result, you must choose colors that do not blend with the background. Dark color contrasts with the light-colored background. In many places, black is the default but that can be changed to other darker colors. A dark font color does not match with the dark background. For example, if you use black and dark blue, it blends in the background making it difficult to read.
However, the lighter color helps to stand out contrast from the background. The website design, as well as the branding color, needs to be given priority. If your brand has a specific color then you can also implement the same color or matching color to the font. Furthermore, this helps to fill the color vibration in the minds of the reader.
Let’s explore to get the most from your theme.
Step 1: Theme Verification
At first, you need to verify whether or not your theme has the option to change the font color.
To verify, Go to Appearance > Customization from your admin dashboard.
Depending on the theme, there may be different customization settings. All you have to do is find the appropriate custom settings for the font color. In our theme, the color setting is inside the general settings. In your case, it may be in a different location.

As you can see, we can change the background color and header text color from this setting.
Here we can change Template Color, Header Text Color, or Background Color as provided by the theme.
In order to select the custom color, we can navigate it until we find our color. You can also keep a hex code in case you want a specific color. If you want to know the hex code of colors, then you can use HTML Color Picker provided by W3Schools. Publish to make these changes.
Now let’s see how to change font color in WordPress via. CSS.
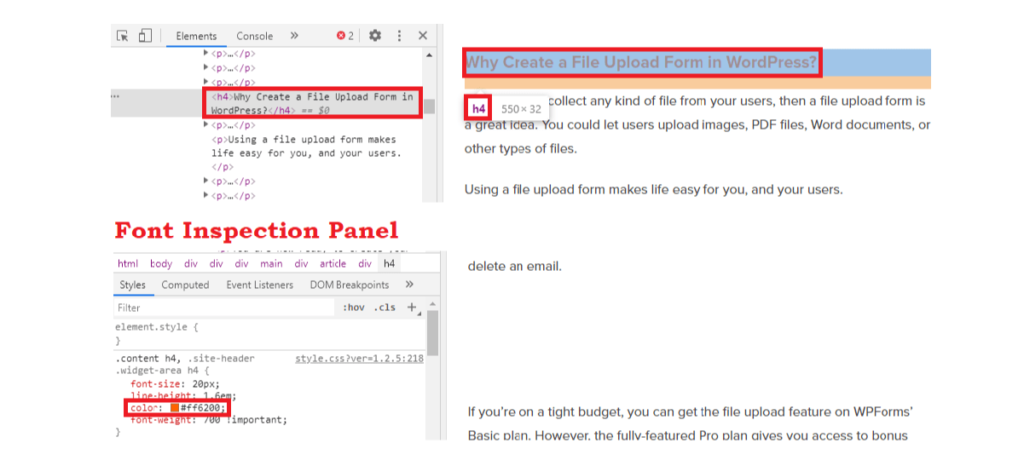
Step 2: Font Inspection Panel
Make sure that you have either a Chrome browser or a Firefox to run this inspection. Firstly, open your website. Take a look at any font item that you want to change. Right Click on it and click on Inspect(Chrome) / Inspect Element(Firefox).
You will see that two new panes are side by side or up and down in the same window. In one window, you will see elements while on the other you can check their styles. Here, a different line represents different elements. Now, select the font that you want to change as shown below:

This displays the associated style in the other pane for the same element. You need to find the one that is applicable to your theme.
Here, “p” represents the paragraph while “entry-content” performs the role to select contents of page and post. You can further see that it is available in the style pane.
Select any existing styles that are provided within the brackets. Hence, you will get a new line.
You can enter the field “color” and pick the color of your choice. When you press tab after entering the field, it will show you the list of available options under that field. If you know the hex value or RGB of any color, then you can mention them as well.
Step 3: Preview
The text on the page changes in real-time when you make these changes in the style. This helps you to see the real view of your page when you save these style changes.
Once you see these changes, if you like to edit more then you can repeat the process until you get satisfied. You can trial and test several times as you will be only observing these changes. Finally, when you get a color of your choice, right-click and copy the entire rule from the browser.
Let’s proceed to insert the CSS style.
Step 4: Insert CSS Style to change Font color
Go to Appearance > Customize > Additional CSS from your admin dashboard.
This opens custom CSS for your theme in a new window. You will see CSS related content in this window.
Here, paste the style that you copied earlier in the bottom of the page. You will have to remove all other lines inside that copied text except the “color” line.
If you want to save these changes, hit the “Publish” button. This is the best way to change font color using CSS styles.
How to change font color in WordPress of specific Post or Page
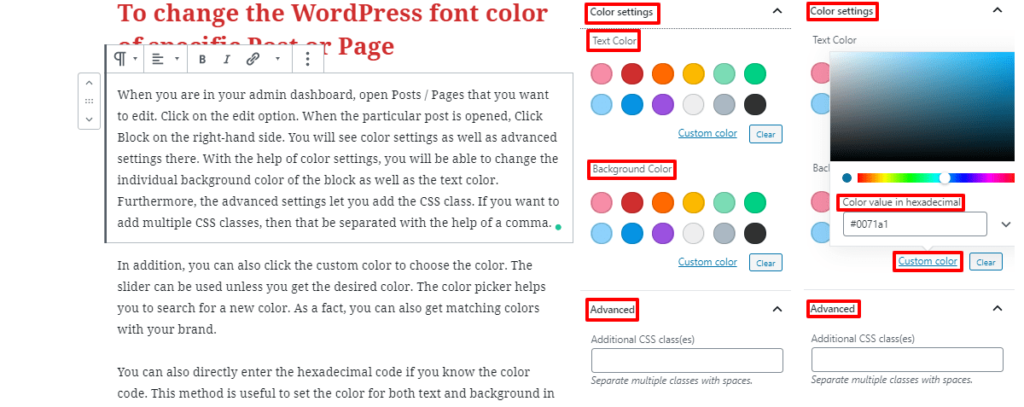
When you are in your admin dashboard, open Posts / Pages that you want to edit. Click on the edit option. When the particular post is opened, Click Block on the right-hand side. You will see color settings as well as advanced settings there. With the help of color settings, you will be able to change the individual background color of the block as well as the text color. Furthermore, the advanced settings let you add the CSS class. If you want to add multiple CSS classes, then that be separated with the help of a comma.

In addition, you can also click the custom color to choose the color. The slider can be used unless you get the desired color. The color picker helps you to search for a new color. As a fact, you can also get matching colors with your brand.
You can also directly enter the hexadecimal code if you know the color code. This method is useful to set the color for both text and background in the case of paragraph block. However, we can expect this customization option in other block types as well in the future.
Wrapping Up
Hopefully, this will make it easier for you to learn how to change font color in WordPress. If you have any further concerns feel free to drop it below.
Additional Readings
